Add Mail Account (iOS): Difference between revisions
(Created page with "right|frameless|385x385px === 1. Access Bluetooth Settings === Search for ''<nowiki/>'bluetooth''' on your PC using the search bar on the bottom-left corner and click on the <code>'''Bluetooth and other devices settings'''</code> menu from the search results. <br> <br> <br> <br> <br> <br> <br> <br> <br> <br> <br> <br> <br> <br> <br> left|frameless|309x309px === 2. Remove Existing TV Entry (if applicable) =...") |
No edit summary Tag: Manual revert |
||
| (25 intermediate revisions by the same user not shown) | |||
| Line 1: | Line 1: | ||
[[File: | [[File:Add mail ios 01.png|right|frameless|313x313px]] | ||
=== 1. | === 1. Add a new Mail account === | ||
On your iOS device, open up the <code>'''Settings'''</code> app and scroll down until you find the '''<code>Mail</code>''' settings. | |||
From within the '''<code>Mail</code>''' settings, tap on '''<code>Add Account</code>''' to add a new email account. You will be presented with multiple provider options. Choose the one that is applicable to you. <blockquote>For work emails, use '''Microsoft Exchange''' as the account provider. </blockquote><br> | |||
<br> | <br> | ||
<br> | <br> | ||
<br> | <br> | ||
<br> | <br> | ||
[[File:Add mail ios 02.png|left|frameless|313x313px]] | |||
=== 2. Enter Your Email Address === | |||
When adding an account, you will be asked to provide your '''Email''' and a '''Description'''. The description is only there to help you differentiate the account from others on your device. You can call this account anything you deem fitting. When you're ready, tap '''<code>Next</code>'''. | |||
Different account types may ask for additional information during this step, so your screen may look slightly different if you are adding an account from a different provider. Keep this in mind. | |||
A cellular or Wi-Fi connection is required to proceed | |||
<br> | <br> | ||
<br> | <br> | ||
<br> | <br> | ||
[[File:Add mail ios 05.png|right|frameless|492x492px]] | |||
=== 3. Sign-in to your Email Account === | |||
You should see a prompt asking you to sign in. Tap on '''<code>Sign in</code>''' to continue. | |||
A new Microsoft login window should appear, asking for your password. Enter the password for your email account and tap on '''<code>Sign in</code>'''. | |||
<br> | <br> | ||
<br> | <br> | ||
| Line 20: | Line 36: | ||
<br> | <br> | ||
<br> | <br> | ||
[[File: | [[File:Add mail ios 08.png|left|frameless|470x470px]] | ||
If you | === 4. Sync your Phone === | ||
After a successful login, you will be presented with various toggles. Each toggle will enable syncing between your phone and your new mail account. If you want all your contacts, calendar invites and notes from your email to sync to your phone, then be sure to toggle those options. | |||
If you change your mind, you can always alter these options later on from the '''<code>Mail</code>''' portion within the '''<code>Settings</code>''' app. | |||
<br> | <br> | ||
| Line 32: | Line 48: | ||
<br> | <br> | ||
<br> | <br> | ||
<br> | <br> | ||
<br> | <br> | ||
| Line 49: | Line 55: | ||
<br> | <br> | ||
<div style='text-align: right;'>'''That's it!''' You | <div style='text-align: right;'>'''That's it!''' You have now added your Email account to your phone. | ||
''<br>If you a experiencing any issues, please reach out to us by [https://njesdit.net/support/open.php submitting a support ticket.]''</div> | ''<br>If you a experiencing any issues, please reach out to us by [https://njesdit.net/support/open.php submitting a support ticket.]''</div> | ||
<div class="keywords"> | <div class="keywords">phone, mail, email, mobile, iphone, ios, ipad, njes, messages, contacts, calendar, sync, add, send, receive</div> | ||
Latest revision as of 14:08, 29 September 2023

1. Add a new Mail account
On your iOS device, open up the Settings app and scroll down until you find the Mail settings.
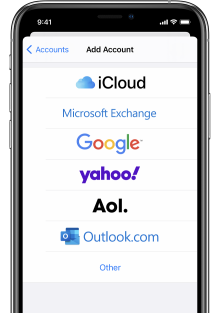
From within the Mail settings, tap on Add Account to add a new email account. You will be presented with multiple provider options. Choose the one that is applicable to you.
For work emails, use Microsoft Exchange as the account provider.

2. Enter Your Email Address
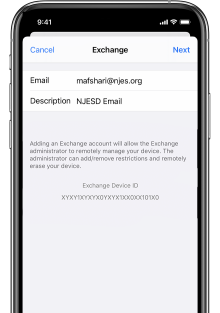
When adding an account, you will be asked to provide your Email and a Description. The description is only there to help you differentiate the account from others on your device. You can call this account anything you deem fitting. When you're ready, tap Next.
Different account types may ask for additional information during this step, so your screen may look slightly different if you are adding an account from a different provider. Keep this in mind.
A cellular or Wi-Fi connection is required to proceed

3. Sign-in to your Email Account
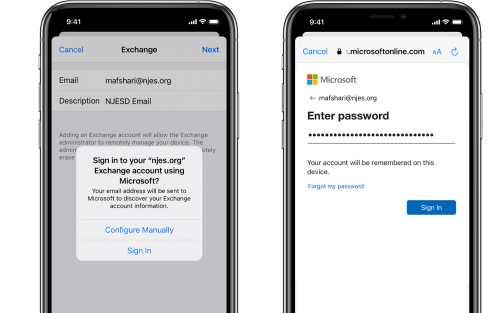
You should see a prompt asking you to sign in. Tap on Sign in to continue.
A new Microsoft login window should appear, asking for your password. Enter the password for your email account and tap on Sign in.

4. Sync your Phone
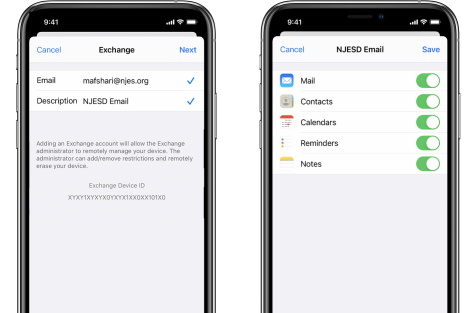
After a successful login, you will be presented with various toggles. Each toggle will enable syncing between your phone and your new mail account. If you want all your contacts, calendar invites and notes from your email to sync to your phone, then be sure to toggle those options.
If you change your mind, you can always alter these options later on from the Mail portion within the Settings app.
If you a experiencing any issues, please reach out to us by submitting a support ticket.
